


The "Green Swamp" Nightmare: A Quick Guide to Restoring a Neglected Pool
November 6, 2025
The "Green Swamp" Nightmare: A Quick Guide to Restoring a Neglected Pool
It's a moment of dread for many holiday homeowners. You arrive at your Algarve villa, excited for that first relaxing dip, you pull back the pool cover and... you're staring at a murky, green swamp.
Perhaps it’s not just green. Maybe the water line is dark with grime, the grout is black, and you can see pastilhas (the small mosaic tiles) lying on the pool floor.
When a property has been left empty, a pool is often the first and most dramatic victim of neglect. After a long winter of rain, sun, and no maintenance, a beautiful asset becomes a daunting, expensive-looking problem.
The first question is always: "Can I fix this myself?"
The answer is... maybe. But there is a crucial line where a DIY job becomes ineffective, dangerous, and can even cause permanent damage to your pool. Here is our quick guide to assessing the damage.
Step 1: Assess the Water – "The Green Scale"
The colour of the water tells you how bad the algae bloom is.
Light Green (DIY Possible): You can still see the bottom of the pool. The water is just hazy. This is a simple algae bloom. It will require a lot of "shock" (super-chlorination), brushing, and 48-72 hours of constant filtering and backwashing, but it's often salvageable.
Dark Green / Murky (Pro Recommended): You cannot see the bottom. The algae is so dense that chemicals will be less effective, and you'll clog your filter system repeatedly. This is what we call a "floc and drop," which requires specific chemicals to sink the algae, which is then vacuumed to waste—a process that can waste thousands of litres of water if done incorrectly.
Black or Opaque (CALL A PRO): This is a "black pool." It's no longer just algae; it's a biohazard of bacteria, mosquito larvae, and decomposing leaves. Do not even try to treat this with chemicals. This pool needs to be drained.
Step 2: Assess the Surfaces – Stains and Limescale
Forget the water for a second and look at the walls.
Slimy Green: This is just algae. It can be brushed off.
Hard, Crusty, White/Grey Stains: This is calcário (limescale). The Algarve's hard water leaves calcium deposits, and algae and dirt get trapped in it, staining it black. No amount of shock treatment or brushing will remove this.
Black or Dark Stains: This is often "black spot" algae, which has rooted into your grout and plaster. It's notoriously difficult to remove.
If you have significant limescale or black spot stains, the pool almost certainly needs to be drained and acid-washed by a professional. This is a hazardous job that uses strong acids to burn off the top layer of plaster and grout, revealing a clean surface.
Step 3: Assess the Structure – Tiles, Grout, and Cracks
This is the most critical step. Water is temporary, but structural damage is serious.
Look closely at the tiles and grout.
Are the grout lines crumbling or missing?
Are tiles (pastilhas) sitting on the pool floor?
Can you pick a tile off the wall easily with your fingernail?
If the answer is yes, STOP. Do not proceed with DIY.
This is your "too far messed up" red flag.
When tiles are coming off, it means the grout has failed, and water is getting behind the tile. This can erode the concrete shell underneath. The problem is no longer a "dirty pool"; it's a potential leak.
Simply sticking the tile back on will not work. The entire area needs to be professionally re-grouted, and potentially re-waterproofed, to protect the pool's core structure.
The Red Flags: When to Call a Professional Immediately
A DIY "shock treatment" is fine for a light green pool. But you must call a professional if you see any of the following:
You cannot see the bottom of the pool.
Tiles are loose, missing, or falling off.
Grout is cracked or crumbling.
You can see hard, crusted limescale stains.
The pump is making a loud grinding noise, or is silent (it may be seized).
You can see cracks in the pool's plaster or shell.
The Dangers of "DIY-ing" a Wrecked Pool
Trying to save a few euros on a severely neglected pool can cost you thousands.
Risk of Equipment Damage: Running a pump that has been sitting for a year can burn it out. Adding massive amounts of the wrong chemicals can corrode your pump's seals and filter.
Risk of Structural Damage: The most common DIY disaster? Emptying a pool incorrectly. An in-ground concrete or fibreglass pool can "pop" or "float" out of the ground if it's emptied when the ground-water level is too high. This will literally destroy your pool.
Wasted Money: You can spend €100-€200 on chemicals, only to find they had no effect because the pool was too far gone and needed to be drained anyway.
What Does a Professional Restoration Involve?
When a pool is "too far gone," we don't just add chemicals. We follow a full restoration process:
Drain & Secure: We safely drain the pool, managing the water table.
Deep Clean: We use high-pressure hoses and often an acid wash to remove all limescale, algae roots, and stains.
Repair: This is the most important part. We replace missing tiles and, crucially, re-grout the affected areas (or the whole pool) with waterproof, chemical-resistant grout.
Service Equipment: We service the pump, clean the filter, and check all pipes.
Refill & Balance: We refill the pool and perfectly balance the water, so it's safe, sparkling, and ready for you to enjoy.
Your time in the Algarve is precious. Don't spend it fighting a green swamp, breathing in chemical fumes, and worrying about broken tiles. A pool is a valuable asset; let us bring it back to life for you.
Contact Solid Key Management for a professional pool inspection and restoration quote.
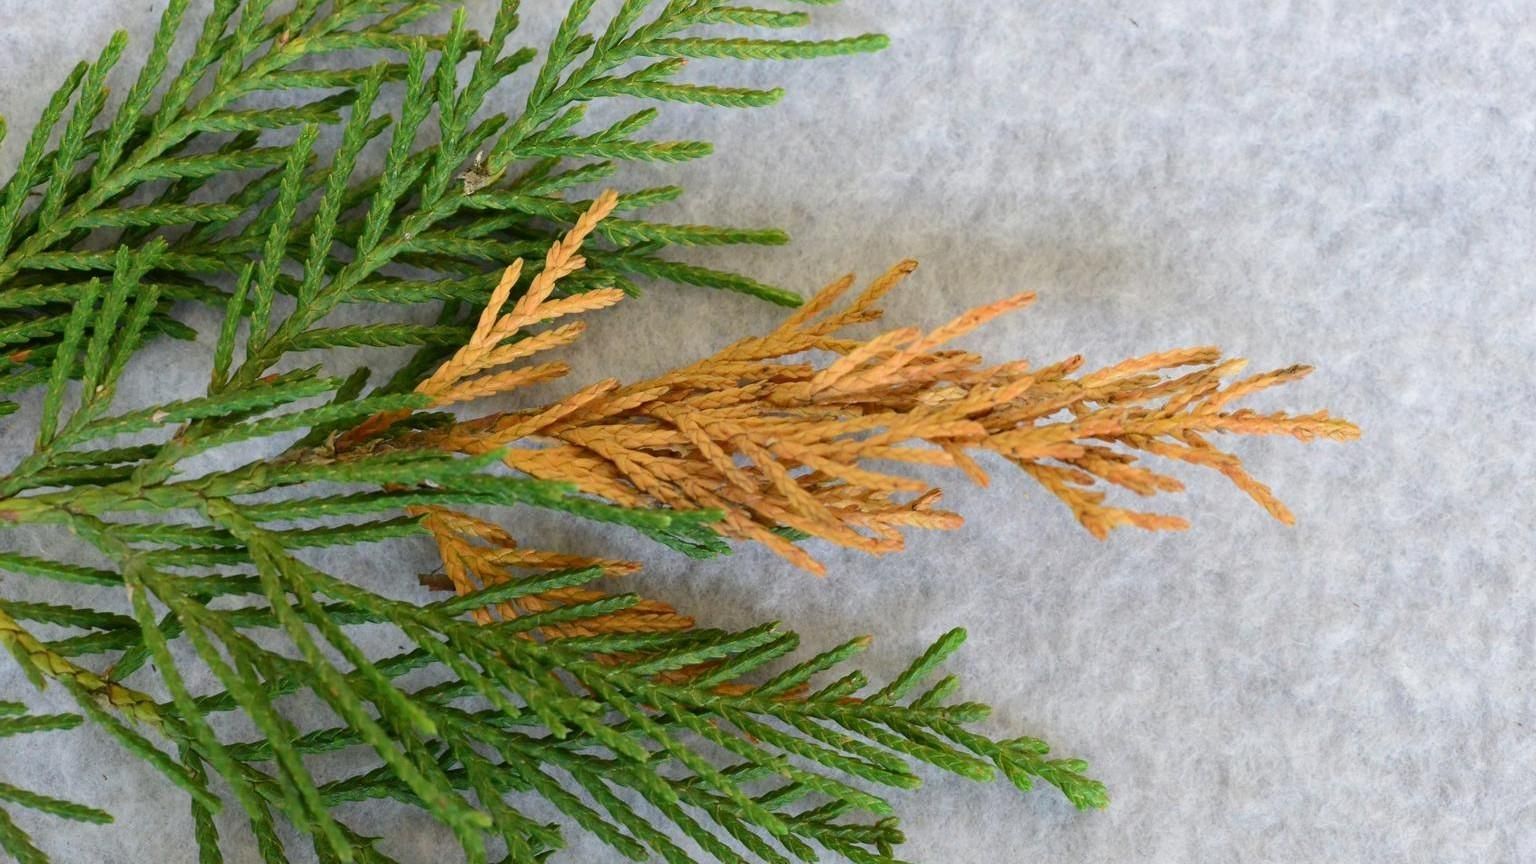
Is your Algarve hedge turning brown? It's a common issue, often Cypress Canker or aphids. Our guide helps you diagnose the problem and save your cypress plants.
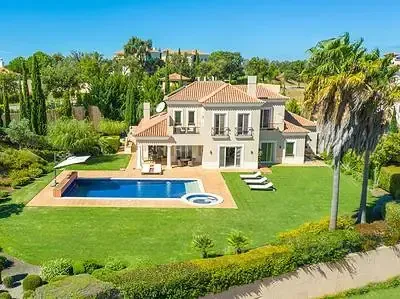
Boost your home's kerb appeal in the Algarve. Discover how proactive property maintenance, from a perfect garden to a clean facade, creates a stunning first impression.